wellnessmed
TwinStim Plus TENS/EMS Combo 8 Modes AC Power 4 Channels
TwinStim Plus TENS/EMS Combo 8 Modes AC Power 4 Channels
Impossible de charger la disponibilité du service de retrait
TwinStim Plus /EMS-COMBO/8 Modes AC Power 4 Channels
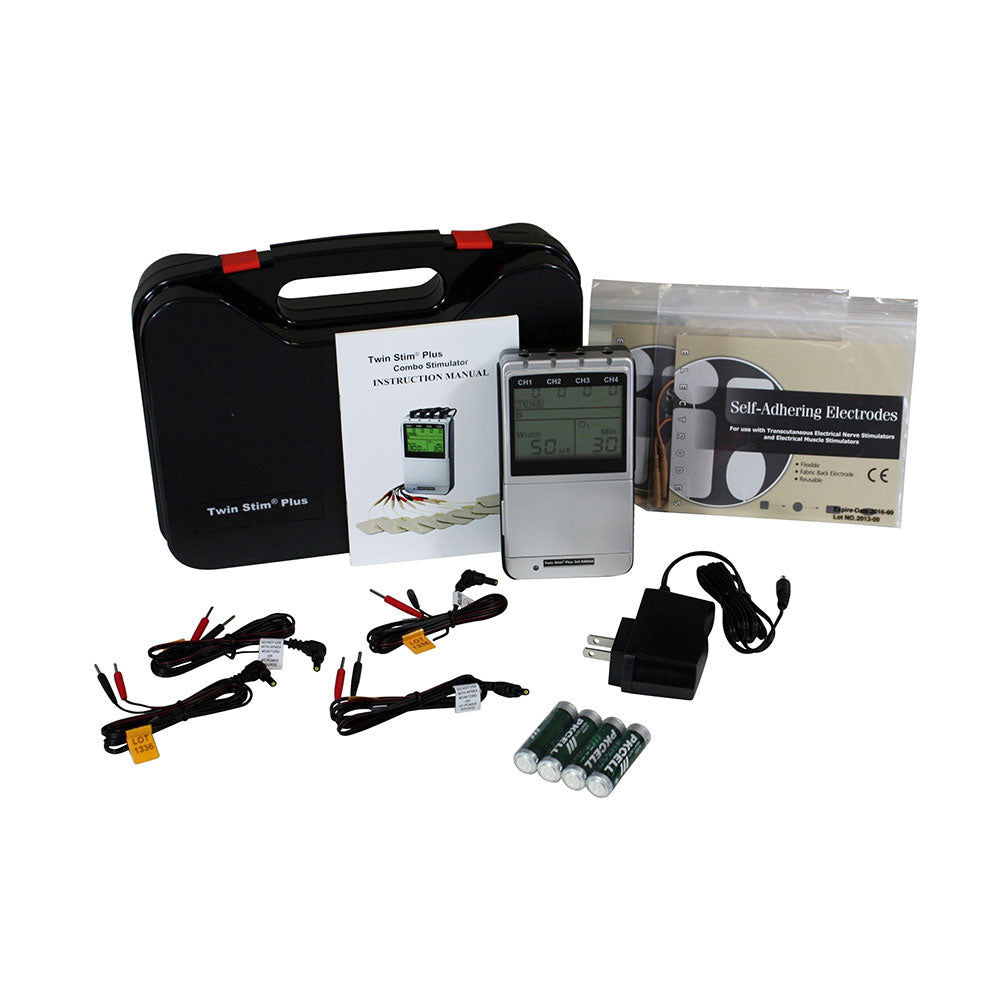
Included:Lead wires, 8 pads, 4 AA Battery and carry case with Instruction BOOK
Manufacturer by Current Solutions USA
Twin Stim puls TENS Unit and Muscle Stim Combo with 8 modes and AC Power
This unit is Tens/EMS Combo with 4 Channels , 8 mode AC Power
Great unit to Buy , Best Seller in USA AND CANADA
|
Carrying Case |
Yes |
|
Unit Size |
Medium |
|
Output Power |
0-80 mA |
|
Tens Adjustable Width Control |
Yes |
|
Digital or Analog |
Digital |
|
Tens Timer |
Yes |
|
Product Type |
Tens Combo |
|
Power Supply |
A/C Adapter/Batteries |
|
Total Size |
17.82 |
Twin Stim Plus Digital TENS and EMS device (2nd Edition) comes with four electrode lead wires, eight electrodes, four AA batteries, AC adapter, instruction manual and carrying case.
|
Channel: |
Four, Isolated Between Channels |
|
Pulse Amplitude: |
Adjustable, 0-80 mA peak into 500 ohm load each channel |
|
Wave Form: |
Asymmetrical Bi-Phasic Square Pulse |
|
Voltage: |
0 to 40V (Load: 500 ohm) |
|
Power Source: |
Four 1.5V AA batteries or DC 9V/800mA adaptor |
|
Size: |
13.8cm(L) x 7.8cm(W) x 2.8cm(H) |
|
Pulse Rate: |
Adjustable, from 2 to 150 Hz, 1 Hz/step |
|
Pulse Width: |
Adjustable, from 50 to 300 microseconds, 10 us/step |
|
On Time: |
Adjustable, 2-90 seconds , 1 Sec./ step |
|
Off Time: |
Adjustable, 0-90 seconds , 1 Sec./ step |
|
RampTime: |
Adjustable, 1-8 seconds, 1 Sec./ step, The "On" time will increase and decrease in the setting value |
|
Five TENS Modes: |
B (Burst), N (Normal), M (Modulation), SD1 ( Strength Duration), SD2 |
|
Three EMS Modes: |
C (Constant) S (Synchronous), A (Alternate) |
|
Burst Mode: |
Adjustable, 0.5 - 5Hz Pulse width adjustable, 50~300|is Frequency fixed = 100 Hz |
|
Normal Mode: |
The pulse rate and pulse width are adjustable. It generates continuous stimulation based on the setting value. |
|
Modulation Mode: |
Modulation mode is a combination of pulse rate and pulse width modulation. The pulse rate and width are automatically varied in a cycle pattern. The pulse width is decreased by 50% from its original setting in 0.5 second, then the pulse rate is decreased by 50% from its original setting in 0.5 second.Total cycle time is 1 second. In this mode, pulse rate (2-150Hz) and pulse width (50-300ns) are fully adjustable. |
|
SD1 Mode: |
The SD1 (Strength-Duration) mode consists of automatic modulation intensity and pulse width in 40% range. The intensity is always increasing while the pulse width is decreasing and vice-versa. The intensity is decreased by 40% while the pulse width is increased by 40% in 5 seconds. In the next 5 seconds, the intensity is increased by 40% while the pulse width is decreased by 40%.Total cycle time is 10 seconds. Pulse rate (2~150Hz) and pulse width (50~300ns) are fully adjustable. |
|
SD2 Mode: |
The SD2 (Strength-Duration) mode consists of automatic modulation intensity and pulse width in 70% range. The intensity is always increasing while the pulse width is decreasing and vice-versa. The intensity is decreased by 70% while the pulse width is increased by 70% in 5 seconds. In the next 5 seconds, the intensity is increased by 70% while the pulse width is decreased by 70%.Total cycle time is 10 seconds. Pulse rate( 2~150Hz) and pulse width (50-3001's) are fully adjustable. |
|
Constant Mode (C): |
Constant stimulation based on setting value. Only pulse width, pulse rate and timer are adjustable in this mode. "Constant" is equalto the "Normal" mode of a TENS unit. |
|
Synchronous Mode (S): |
Stimulation of both channels occurs synchronously. The "ON" time including "Ramp Up" and "Ramp Down" time. Therefore, the setting of ON Time should be no less than two times of the "Ramp" time in this mode. ON TIME > Ramp up + Ramp down |
|
Alternate Mode (A): |
The stimulation of the CH2 will occur after the 1st contraction of CH1 is completed. In this mode, the setting of ON Time should be no less than two times of the "Ramp" time. The OFF Time should be equal or more than the ON Time. ON TIME >Ramp up + Ramp down OFF TIME >ON TIME |
|
Timer: |
Two Adjustable timers, from 1 to 60 minutes or Continuous. Adjustable in 1 minute each step from 1 to 15 minutes, and 5 minutes each step from 15 to 60 minutes. Treatment time countdown automatically. |
|
Patient Compliance Meter: |
This unit can store 60 sets of operation records. Total recorded time is 999 hours. |
|
Low Battery Indicator: |
A low battery indicator will show up when the battery is low. |
|
Operating Condition: |
Temperature:0°~40°C Relative Humidity: 30%-75% Atmosphere Pressure : 700Hpa~1060Hpa |
|
Remark: |
There may be up to a +/-5% tolerance of all parameters and +/-20% tolerance of amplitude & voltage |
The Current Solutions Twin Stim Plus TENS and EMS unit provides the user a multitude of pain relief options for nerve and muscle pain. Most commonly used to treat back and neck pain, this device is able to treat other areas of the body. Let’s review the overall construction of this TENS combo unit. At the very top of the unit you will find four ports (channels) where you will plug in the electrode leads along with 4 LEDs. In the front at the top, the LCD screen displays the mode, pulse width and timer information.
Nested underneath you will find 13 buttons for operation. This includes pulse intensity control, mode control, set control, increment control and a power button. There is even a belt clip on the back making it user-friendly while in operation. If you prefer holding the device, the sides are made of rubber with edged grooves for a firm grip.
You should consult your physician before using any devices for your appropriate settings. Also, make sure you click the tab named detailed tech specs for further descriptions of modes and other advanced features.
We also recommend browsing all to ensure you have an ample supply in case your current electrodes are no longer valid for use or you prefer a different size. The electrodes included for this machine are sized by 1.5" by 1.5". It’s common for a single electrode to go through 5 to 6 uses before it needs to be replaced.
The manufacturer for this Tens Combo is Current Solutions
Electrode Placement Chart
Use this chart as a reference to guide you in placing your tens unit or ems unit electrodes. If you consult with a medical professional about using your tens unit, they will likely be able to assist you further in determining where to place your tens unit electrodes.
Additional Electrode Information
Use this chart as a reference to guide you in placing your tens unit or ems unit electrodes. If you consult with a medical professional about using your tens unit, they will likely be able to assist you further in determining where to place your tens unit electrodes.
Electrode Skin Care
- Wash the area of skin where you will be placing the electrodes, using mild soap and water before applying electrodes, and after taking them off. Be sure to rinse soap off thoroughly and dry skin well.
- Excess hair may be clipped with scissors; do not shave stimulation area.
- Wipe the area with the skin preparation your clinician has recommended. Let this dry. Apply electrodes as directed.
- Many skin problems arise from the “pulling stress” from adhesive patches that are excessively stretched across the skin during application. To prevent this, apply electrodes from center outward; avoid stretching over the skin.
- To minimize “pulling stress”, tape extra lengths of lead wires to the skin in a loop to prevent tugging on electrodes.
- When removing electrodes, always remove by pulling in the direction of hair growth.
- It may be helpful to rub skin lotion on electrode placement area when not wearing electrodes.
- Never apply electrodes over irritated or broken skin.
Application of Re-usable self Adhesive Electrodes
Application
- Clean and dry the skin at the prescribed area thoroughly with soap and water prior to application of electrodes.
- Insert the lead wire into the pin connector in the pre-wired electrodes.
- Remove the electrodes from the protective liner and apply the electrodes firmly to the treatment site.
Removal
- Lift at the edge of electrodes and peel; do not pull on the lead wires be cause it may damage the electrodes.
- Place the electrodes on the liner and remove the lead wire by twisting and pulling at the same time.
Care and Storage
- Between uses, store the electrodes in the resealed bag in a cool dry place.
- It may be helpful to improve repeated application by spreading a few drops of cold water over the adhesive and turn the surface up to air dry. Over Saturation with water will reduce the adhesive properties.
Very Important!
- Do not apply to broken skin.
- The electrodes should be discarded when they are no longer adhering.
- The electrodes are intended for single patient use only.
- If irritation occurs, discontinue use and consult your physician.
- Read the instruction for use of self-adhesive electrodes before application

-
Livraison expliquée
Nous offrons la livraison gratuite au Canada sur les commandes de plus de 50 $.***
***Veuillez noter que les commandes très lourdes/volumineuses sont exclues de la livraison gratuite, des frais d'expédition peuvent s'appliquer à ces commandes. Les envois vers des emplacements éloignés, aériens ou ruraux peuvent également entraîner des frais d'expédition supplémentaires.
-
Politique de retour
Pour pouvoir bénéficier d'un retour, votre article doit être inutilisé et dans le même état que celui dans lequel vous l'avez reçu. Il doit également être dans l'emballage d'origine. Nous ne pouvons pas revendre un article qui a été largement utilisé, nous ne pouvons donc pas offrir un retour complet sur ces articles.


